Owlbear Rodeo has quickly become my top choice for an RPG virtual tabletop tool due to its ease of use, elegance, and appearance.
Here are some of my top tricks, hacks, or hidden features I use when using Owlbear Rodeo.
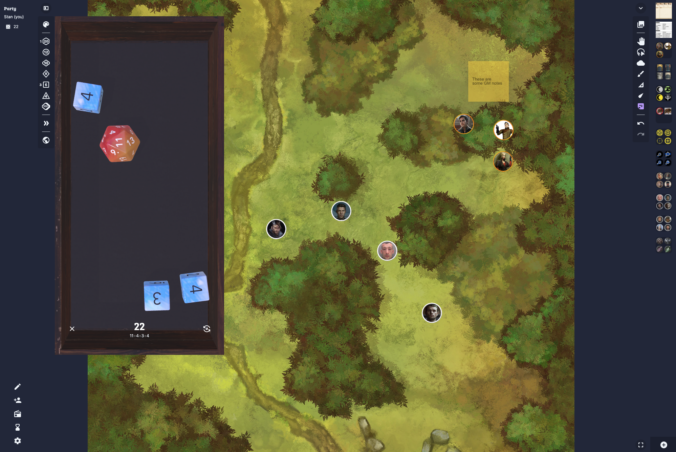
Use Private GM Notes — Use the ‘notes’ feature to place GM-only notes on the battlemat. Use the ‘hide’ feature to hide it from the players. Keep all sorts of notes here. You could have a note with a monster’s key stats for example. Don’t forget that using Shift + Enter will allow you to add a new line in ‘notes’. You can use this feature for all kinds of hidden images with diagrams, notes, or secret maps for the GM (sort of like a hidden GM screen). I particularly like to have the top names of people, places, and things listed, visible only to the GM.
Use Notes to Track Initiative — I like to outsource initiative tracking in my games. A player takes personal notes on initiative scores, and then lists the initiative order in a Note (using Shift + Enter will allow you to add a new line in ‘notes’).
Use Import/Export to Manage Multiple Campaigns — I like to Export my Owlbear files often, usually at the end of a game. If I have multiple campaigns, I just clear my cache and delete any current Owlbear files, and import the backup of the second campaign to switch over to that Owlbear collection of tokens and maps. I keep all Owlbear export backups on a cloud drive for easy access and version control.
Use Effect Tokens — Create tokens in the shape of auras, spell effects or blast radius for spells, powers, or special weapons. Make the size setting of these tokens so when you drag them onto the battle mat they are already the correct size and flag it as a prop or vehicle token. Since they are tokens you can move them around if they are tied to your character. (I’ve not done this yet but it was suggested by another Reddit user at some point.)
Use Drag and Drop to Import Tokens and Groups — You can drag and drop tokens or maps onto Owlbear from your desktop on the fly. If you drag a group of tokens together and import them all at once, it automatically groups tokens into a folder.
Use Hidden Tokens for ‘On Deck’ Creatures — If you click the “eye” icon on a token it hides the token from the players but still has it semi-visible to the GM. Useful if you have enemy NPCs or monsters ‘On Deck’ ready for combat.
Use Text Labels for HP and Conditions — You can use the text label beneath tokens for all kinds of cool things. For NPCs and monsters, I note the damage that creature has taken (which still preserves the mystery of how many hit points the creature has). You can also note conditions, exhaustion, and other effects. A token could read “-12 HP” or “-20 HP, faerie fire”. You can also copy / paste emojis into a label to indicate status effects and conditions. For my Traveller games, I use tokens for Space Ships. Many ships have the same icon, but I put the ship name in the text label so you can easily tell them all apart.
Use Halo Rings to Track Wounds — In many games, I use the Halo rings to track wound levels. On the first hit, you get a green colored circle. On the second, you add a yellow circle. On the third, you get a red one. On the 4th hit, the creature is dead. You can treat each ‘wound level’ as a range of hit points (e.g. 8 hit points) so if you get 1-8 points of damage, you get one wound leve, but if you got 12 points of damage from a single hit, that would be two wound levels. Adjust all this to your taste and the rules you’re using. This house rule can be added to almost any traditional RPG rules system.
Use Emojis for Token Status —You can copy paste emojis into a label to indicate status effects and conditions. Some examples:
Recent Comments