The new Pathfinder Beginner Box has generated quite a buzz. The fantastic pawns — stiff cardboard cutouts with bases that server as miniature substitutes — have players clamoring for Paizo to issue new sets of pawns.
Want to create your own do-it-yourself Beginner Box style pawns? Here’s a tutorial on how to do just that.
First, find some images you want to use for your pawns. In the example I’m using for this photo tutorial, I use images from the Pathfinder Paper Minis: Pathfinder Adventure Path #1—”Burnt Offerings”. Those Paizo paper minis have their own method to stand them up using only paper, but they aren’t as attractive and don’t match the new slick Beginner Box pawns.

I created an Open Office Draw template. Download the RPG Hacker Pawn Template here. If you don’t have OpenOffice, you can download the software free here.
The images need to be either the Standard pawn size (28mm wide by 48mm high) or the Large pawn size (48mm wide by 63mm high). I use Gimp to take the image (which can be a screenshot or an image exported from a PDF) and resize it to one of these sizes. Make sure it is at least 200 dpi (though 300 dpi or 600 dpi will also work). Then, paste it into the OpenOffice template.
In OpenOffice, you’ll want make a second copy of the image and then right mouse click on the image and choose ‘Flip’ / ‘Horizontal’ to get a mirror image to use for the back of the pawn.
Once you have the images for the pawns set up in the template, then assemble your supplies. You’ll need:
- Fantasy Flight Plastic Stands (I bought my for about $2 for a pack of 10 here)
- Exacto Knife
- Scissors
- White 3mm Foam Sheet (I got mine at Hobby Lobby — cost $0.99 for one sheet).
- A cutting board
Optionally, you can use a corner punch (also from Hobby Lobby) if you want to use the plastic card technique.

Here’s what the Fantasy Flight stands look like. They work about the same as the black stands that come in the Beginner Box, but they are a little bit tighter I think.

Next step is to cut out the pawn images from the template you printed out. I use an Exacto knife on a hobby cutting board for this.

Now on to cutting the foam out. There are two ways you can do this. The first is to take some plastic card (feels like a credit card — I used a comic book divider from the comic store for this image) and cut out a piece to the size of the pawn and use a round edge cutter from Hobby Lobby to round the corners.

You then use this as a guide to use your Exacto knife to cut out the foam. It is floppy, but don’t worry, once you glue it it will be stiff and feel like Balsa wood.

After I first did this a few time, I then discovered that the pawns themselves make good guides for your Exacto knife, so I’ve not switched to this technique. Whether you use the plastic card or a cardboard pawn, you use it as a guide to cut both the paper and the foam.

Then glue the images to each side of the foam. I use a glue stick, but rubber cement will also work.

Make sure it lines up correctly. You can move it around a bit before the glue sets to get it aligned just right.

One issue I’ve had if I take them out of the stands a lot is that the bottom edge can fray and catch on the plastic stand. So I found a solution.

Put Scotch tape along the bottom.

Then trim it with scissors.

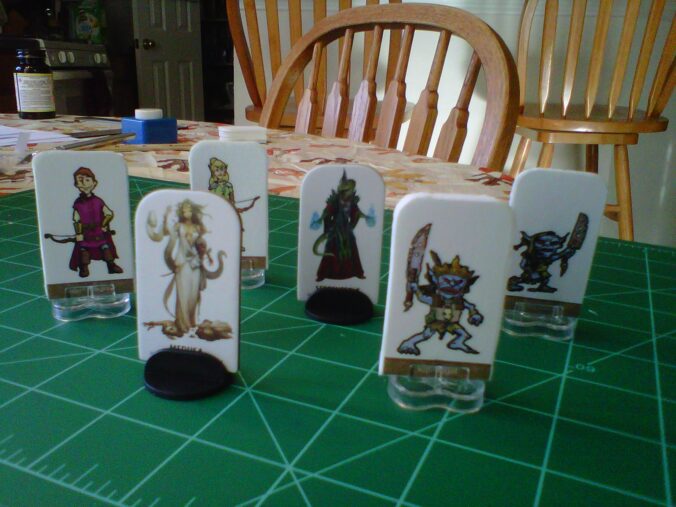
Lastly, insert into the Fantasy Flight Plastic Stands. Here’s the final product. These were my first batch using the plastic card technique. My new pawns using the cardboard pawns for templates look even better. I figure it costs about $0.02 per figure flat, and about $0.25 for each stand. They look pretty good next to the regular Pathfinder Beginner Box Pawns I think.

Massive thanks for sharing your methods. This will be a weekend project for me! Can’t wait to see my PFS characters printed up.
Best DIY pawn/paper mini article I found. Second best was to search for “board game” card/token stand. Best price I found was at rolcogames.com; current retail is 25 for $3.25 and 100 for $10.50, plus shipping of course. I didn’t check the wholesale price. Also, they have “universal pawns.” You should ba able to print label, peel & stick, and be done.
Great! I lost my hope finding a tutorial like this. Thanks!
Awesome tutorial, thanks a lot! This is exactly what I was looking for.
Great tutorial. I went the 100% paper route. I know this gives up portability but it’s lighter and cheaper. I like your method. There is no better method – just whatever floats your boat. Great job.
Yes. My daughter love the comic as well. You asked for some pictures of the miniatures. Well, here you go. This shows the process from A to Z. Hopefully you can share this with others.
Here are the minis for Sidekick Quests:
https://www.dropbox.com/s/mtd4xsl0rr3fxz8/Sidekick%20Quests%20-%20Miniatures.pptx
For a bit more fun, here are the minis for D&D the 80s Cartoon Series:
https://www.dropbox.com/s/4t46ff8g06356m7/DnD%20Cartoon%20-%20Miniatures.pptx
I printed these using an Epson semi-pro printer with no-smudge Claria ink on Super-D-Duper Premium Ultra Awesomeness. That is the most expensive part of the project. The instructions below cover the base construction and final assembly.
You will need:
1. Patience
2. Printer
3. Paper – Heaviest pre-colored stock that your printer will accept. I chose a green 12×12 scrap book paper.
4. Scissors
5. Clear Glue Sticks
6. 15″ or larger Paper Trimmer
7. More Patience
Step 1: Download this PowerPoint template and print it out on a wide format printer. I prefer scrapbook paper for its thickness. I also have a wide format printer that can handle 12×12. https://www.dropbox.com/s/1ldulfx6l0olx27/Miniature%20Pawn%20Base%20Stands%20-%20Template%20-%2012×12.pptx
Step 2: Print! Be sure to tell PowerPoint the printer is 12×12 or you will waste paper. https://www.dropbox.com/s/dptk69hs6ly3pjd/100_1136.JPG
Step 3: Verify the quality of the print job. https://www.dropbox.com/s/9euu03k48u340sk/100_1138.JPG
Step 4: Cut this bad boy up with the Paper Trimmer. You have one – right? I wait till the kids are upstairs. It’s a dangerous contraption. https://www.dropbox.com/s/rotmp92lm2cf8yw/100_1139.JPG
Step 5: Buckle yourself in for detail cutting with scissors. So begins the heavy labor part of the project. https://www.dropbox.com/s/l9rvs74c1yp2vzq/100_1140.JPG
Step 6: More labor. This time start folding on the indicated lines. It’s not rocket science. Just go at it. Try not to double fold or it will not be able to hold its shape. https://www.dropbox.com/s/m5a36o6fg2x5w82/100_1143.JPG
Step 6: Glue Phase 1. Attach T-shape upright to base. Be generous with the glue stick for Phase 1. https://www.dropbox.com/s/vkqa2kv4yugfzk3/100_1144.JPG
Step 7: Glue Phase 2. Flip the Hexagon flaps back over the T-shap upright to secure. Again, be generous with the glue stick. Just be careful to not get glue on the upper exposed surface. Even though it is clear, it will show carelessness. https://www.dropbox.com/s/cb033use4dl6ldo/100_1147.JPG
Step 8: Attach your folded miniature to the assembled base. Slather on the glue on the miniature first and be very careful to not get glue on the pictured side. https://www.dropbox.com/s/ecnqpodtronmqlg/100_1148.JPG
Step 9: Oh – no way! This is looking too good to be true now. Let me at that dungeon. https://www.dropbox.com/s/i5u1odgmkx0mp3e/100_1151.JPG
Step 10: The coast is clear. Call the kids back into the room and start rolling the d20.
@Martin — that is an amazing technique! Thanks for the contribution. 🙂
How would this work if I wanted to make pawns larger the Large (Huge or Gargantuan)?
Just increase the width and height of the cutout — you can match Paizo’s larger size if you want (their black dragon in the starter set for example). If you make something really large use two bases to hold it.
You can purchase “chipboard” (the same cardboard that’s used for the minis) and Full Sheet Labels to produce a pretty darn good pawn set too. Both come in an 8.5×11. Run the label through a normal printer, making a flip copy just like you did. The Sheet Label is already self gluing, so I match up the corners of the label and cut it out afterwards. I’ve used this with photos of the pawns I already have to make more of a particular beasty. I dig the idea of the scotch tape to reinforce the wear-points too. Really like these pawns and hope Pathfinder keeps putting out new ones.
–Jak
An awesome suggestion!
Dear good sir, THANK YOU for this awesome tutorial & for uploading the pawn-template. I used fold ups before, but these flat pawns are so much easier to store.
I use gimp to clean up the images, but then i simply paste them into the template sheet and resize them there, works perfectly. I also don´t bother with the backsides, i don´t have any rear graphics most of the time anyway. But that way i can put numbers on the backs of npcs & monsters which help me with the book keeping of hp ect.
And if anyone else from germany stumbles upon this great tutorial (and reads the comments), i ordered no-name cheap plastic stands from a german boardgame supply store. These are small clear ones that work perfectly with standard pawns: http://www.spielematerial.de/de/standfuesse.html
And these are coloured ones which are quite a bit higher, but could work with big monsters: http://www.spielematerial.de/de/standfuesse-variabel-farbig.html
Once again, thanks for this great tutorial.
Thanks Spieler for the post! Glad my tutorial was helpful! 🙂